Sunday, March 22, 2009

My Mom's Style Potato Fry

This was the very first item that I learned as a novice cook and my most favorite side dish (actually, I have it as a snack ;-)). It is also the ONLY item that my sister knows to make (she will probably kill me for letting out her little secret). There are 2 different variations here based on how you feel about cutting potatoes ;-).

Ingredients (about 2 - 3 servings):

Potatoes (I use yukon gold) - 4 to 5 medium sized ones cut into small, thin pieces (just like the picture :-))
Cooking oil - 2 tablespoons
Coconut oil (a must) - 2 to 3 teaspoons
Mustard seeds - 1 teaspoon
Urad dhal - 1 to 1.5 teaspoons
Asafoetida - 1/4 teaspoon
Red chilli powder - 1 to 2 teaspoons (vary this to suit your taste)
Salt to taste

Procedure:

1. Heat some cooking oil in a pan, pop mustard seeds, add the urad dhal and asafoetida and fry until the urad dhal turns light golden brown in color.
2. To the above step, add the finely cut potatoes and mix the contents well. Keep frying for a about 5 minutes on medium heat.
3. Add red chilli powder and salt and fry more until the potatoes get cooked and turn a little crunchy and turn off the stove.
4. Add the coconut oil (this is all that does the magic) now and mix everything well once again. That is it!!!!

Note:
1. You can add sambar powder instead of red chilli powder to give it a slightly different flavor, but don't forget the coconut oil at the very end :-).
2. If you don't want to do any cutting work, you can boil and mash the potatoes and follow the above procedure. I normally make the mashed version if I'm traveling and want to take chappathis with me. I simply roll the chappathi with the curry inside and it neatly fits into a ziploc :-). The picture below depicts the mashed version.

Both varieties make for a good snack as well as a side dish and taste extrodinary with curd rice.

Sunday, March 15, 2009

Moar Rasam


Buttermilk, which is called "more" (yes, it is pronounced like the English word "more") in Tamil, in very good to keep your body cool when it gets overheated. This rasam, which is made from moar, is the easiest of all rasams. I use ajwain in this for seasoning, which is a very uncommon spice that is found only in certain parts of Asia. Ajwain is also used as a home medication to treat digestive disorders, nausea, motion sickness and the like.

Ingredients (about 3 - 4 servings):
Plain yogurt - 1.5 to 2 cups (using a measuring cup)
Cooking oil - 2 teaspoons
Mustard seeds - 1/2 teaspoon
Asafoetida - 1 pinch
Ajwain seeds - 1 full teaspoon
Cilantro - a few strands broken by hand
Salt to taste
Procedure:
1. Take plain yogurt in a deep vessel, add about 3 to 4 cups (using a measuring cup) of water to it and churn it thoroughly into moar (buttermilk) so that it is free of lumps.
2. In a small pan, heat about a teaspoon of oil, pop some mustard seeds, add asafoetida to the oil and set aside.
3. In the same pan, heat another spoon of oil, add the ajwain seeds and set them aside.
4. Heat the buttermilk from step 1 on medium heat, until it gets warm (or a little more than warm, roughly about 5 minutes) and turn off the stove. DO NOT BOIL LEST IT WILL CURDLE.
5. Add the seasonings from step 1 and 2 to the buttermilk, some salt, a few strands of cilantro and your moar rasam is all done.
Tip:
To make it more easier, I heat some water in a kettle and use the hot water to make buttermilk so that I don't have to use the stove and don't have to worry about the container in which I'm making this. Just add the seasonings and salt and you are all set :-). It is that simple!!!
Whenever you feel like having some hot rasam on a cold/sick day, try this and see how easy, healthy and appetizing it is. You can drink it as such or mix with with some cooked rice.

Awards - A First Time Affair :-)

Sanghi at http://sanghi-tastybites.blogspot.com was very kind to shower these awards on me. This is the first time that I'm receiving awards like this since I started my blog and am truly excited. Thank you very much Sanghi dear :-).

I take this opportunity to thank Mahimaa, an undergrad friend of mine, who introduced me in her blog. Thanks a lot Mahi :-).

Wednesday, March 11, 2009

Idli Upma

During my primary school days, a colleague of my Dad used to pick me and his son from school on days when my Dad had to take evening classes at his college. I used to wait at that Uncle's place until my Mom came back from work and took me home. Almost always on such days, she would make idli upma or semiya (vermicelli) upma, as those were my favorites. This dish brings back fond memories of those days :-).

When you have some left over (or fresh) idlis and if you are bored of having them with chutney or sambar, you can turn them into this amazing upma. It is quick, easy and tasty.

Ingredients (1 serving):

Idlis (so called Indian rice cakes) - 4 to 5 just broken into small pieces by hand
Onions - 2 medium sized ones chopped finely
Cooking oil - 1 tablespoon
Mustard seeds - 1 teaspoon
Urad dhal - 1/2 teaspoon
Channa dhal - 2 teaspoons
Asafoetida - 1/4 teaspoon
Dried red chillies - about 3 of them (vary this to suit your spice level)
Curry leaves (optional) - a few
Salt to taste

Procedure:

1. In a pan, heat some cooking oil, add mustard seeds and wait for them to splutter. After the mustard splutters, add the urad dhal, channa dhal, asafoetida, red chillies and curry leaves and fry until the dhals turn light golden brown in color.
2. To the seasoning in step 1, add the finely chopped onions and fry until they turn golden brown in color.
3. To step 3, add the broken idlis, some salt, mix everything well, fry for 5 minutes and turn off the stove.

Note:
1. If you sprinkle a little water while breaking the idlis, it will be a lot easier and it won't stick to your hand much.
2. Beware while adding salt as the idlis already have some salt in them.

This makes for a quick and tasty breakfast/snack. Enjoy!!!!

Tuesday, March 10, 2009

Veppampoo (Neem Flower) Rasam

Vembu is Neem in Tamil. Veppampoo is the flower of the neem tree. Every part of the neem tree is considered to be of medicinal value, let alone the flower. There are several anecdotes which say chewing a neem leaf every day cures diabetes. Back home, I've also seen people suffering from diabetes swallow the freshly ground paste of neem leaves. As much as it is full of medicinal value, every part of the neem tree is equally bitter. You can smell the bitterness I would say :-). I think that is the reason why there is a practice of using sundried veppampoo in cooking. This rasam does not taste bitter and has a unique flavor and taste, which even my roommate liked the very first time and now we make this rasam quite often. Also, a dish called veppampoo pachchadi, made from FRESH veppampoo, is always in the menu for Tamil New Year to signify and accept life's bitter side. Below is a picture of dry veppampoo for your reference.

Ingredients (about 3 - 4 servings):


Tamarind soaked in water - about the size of a small lemon
(If using tamarind paste, about 3/4 teaspoon of it)
Asafoetida - 1/2 teaspoon
Salt to taste

For seasoning:

I use two separate set of seasonings for this rasam, one that I add while the rasam is under its way and the other one at the very end.

1st set:

Cooking oil - 1 teaspoon
Mustard seeds - 1 teaspoon
Green chillies - 2 to 3 cut into small pieces

2nd set:

Cooking oil - 2 teaspoons
Veppampoo (sun dried) - 2 to 3 tablespoons
Cilantro - a few strands broken by hand

Procedure:

1. Extract about 3 cups (using a measuring cup) of the juice of tamarind water in a deep vessel or dilute the tamarind paste with 3 cups of water and set aside.
2. In a small pan, heat 1 teaspoon of cooking oil, add mustard seeds and wait for them to splutter. Add the green chillies after the mustard splutters and set aside.
3. In the same pan used in step 2, heat about 2 teaspoons of cooking oil and fry the veppam poo until it turns dark golden brown (but not burnt) in color and set aside.
4. Add asafoetida, salt and the seasoning from step 2 to the tamarind water from step 1 and boil it on medium heat for 10 -15 minutes, until the raw smell of tamarind goes away and turn off the stove.
5. Mix the fried veppampoo from step 3 with the rasam and garnish with cilantro.

Tip:
If your stomach is upset for some reason, you can simply fry a couple of tablespoons of sundried veppampoo in about a teaspoon of cooking oil, mix it with cooked rice along with little salt and have it for a couple of days. You will notice the difference for yourself :-).

Like I said before, this rasam has a very unique flavor to it and goes well with rice. I won't say that everyone will equally like it the very first time they try this rasam, but it is definitely worth a shot :-).

Friday, March 6, 2009

White Kurma

I was going to make chappathis for dinner on Saturday and that got me into thinking about a different side dish to go with them. I was reminded of the white colored kurma (I call it white kurma just to differentiate it from the regular kurma :-)) that is usually served with aappam in most of the restaurants in Tamil Nadu. I used to like it with chappathis a lot more than with aappam. So, I googled for "hotel kurma" and got a lot of hits, of which I was tempted to follow this as I had a hunch that it would come out well (oh yeah, I get these visions at times ;-)). I used the same ingredients from that link, but changed the proportions to suit my taste. The end result was exactly what I had in mind and was simply superb :-).

Ingredients (about 3 - 4 servings):

Veggies of your choice - about 3 cups (using a measuring cup) cut into uniform size for them to cook evenly
(I used carrots, peas, potatoes, chayote squash (called chow chow), corn, lima beans and green beans)
Green chillies - 3 to 4 slit into half
Onion - 1 small finely chopped
Cooking oil - 2 tablespoons
Cumin seeds - 1/2 teaspoon
Fennel seeds - 1/2 teaspoon
Bay leaves - a few
Ginger garlic paste - 1 teaspoon
Plain yogurt - 2 tablespoons
Coriander powder - 1/2 teaspoon
Milk - 1/4 cup (using a measuring cup)
Chick pea flour (besan) (optional) - 1/2 teaspoon mixed with little water
Cilantro - 2 teaspoons finely chopped

To grind into a paste:

Grated/powdered coconut - 3 to 4 tablespoons
Cashews (raw or roasted... doesn't matter) - 2 to 3
Green chillies - 3 to 4
Poppy seeds - 1 teaspoon
Cinnamon - 1/4 inch stick
Cloves - 3
Cardamom - 1

Procedure:

1. Grind grated/powdered coconut, cashews, green chillies, poppy seeds, cinnamon stick, cloves and cardamom to a fine paste. Mix the paste with plain yogurt thoroughly so that there are no lumps in the yogurt and set aside.
2. Boil the veggies separately such that they become soft (but NOT too soft and mashed) and set aside.
3. In a vessel, heat some cooking oil, add bay leaves, cumin seeds, fennel seeds, sliced green chillies and chopped onions and fry until the onions turn light golden brown in color.
4. To the onions in step 3, add the ginger garlic paste and fry for 2 to 3 minutes.
5. Add the softened veggies to step 4 and mix everything well. Add the paste from step 1, coriander powder, some salt and bring it to a boil.
6. Once it starts boiling, you can add the milk to it and boil for about 7 minutes on medium heat. If you feel that the kurma is too thick, you can add some water to get it to the right consistency. If otherwise, you can add the chick pea flour mixed in water to thicken it.
7. Garnish with chopped cilantro and enjoy the white kurma.

Note:
Absolutely NO turmeric or chilli powder in this. The spiciness of this recipe is derived ONLY from the green chillies. Adding red chilli powder or turmeric will not yield the so called "white kurma" ;-).

The tanginess from the yogurt, the sweetness from the coconut and the spiciness from the green chillies gives it a good blend of flavor. This goes very well with aappam, paratha, idiappam and chappathi. Well, I just made it to go with chappathi and it tasted great! How about you try the rest and let me know your opinion, huh???? ;-)

Milagu (Black Pepper) Rasam

Milagu rasam is a standard at our house when any of us fall sick. And, I can only say that it is soothing and at the same time tastes great even when you don't have an appetite. It was the very first item that I learned when I started cooking (in my 3rd year of undergraduate studies) and the only and only rasam that I knew to make until I came to the US.

Ingredients (about 2 - 3 servings):

Tamarind soaked in water - about the size of a 1/2 inch ball
(If using tamarind paste, 1/2 teaspoon of it)
Tomato - 1 medium sized cut into big chunks or finely chopped or just squished by hand
Asafoetida - 1/4 teaspoon
Salt to taste

To dry grind into a coarse powder:

Dried red chillies - 2
Whole black pepper - 2 teaspoons
Cumin seeds - 1 to 1.5 teaspoons
Coriander seeds - 1 teaspoon
Toor dhal - 1 tablespoon

For seasoning:

Cooking oil - 1 teaspoon
Mustard seeds - 1 teaspoon
Curry leaves (optional) - a few
Cilantro - a few strands broken by hand

Procedure:

1. Make a coarse powder of red chillies, whole black pepper, cumin seeds, coriander seeds and toor dhal and set aside.
2. In a deep vessel, extract about 2 cups (using a measuring cup) of the juice of fresh tamarind or dilute the tamarind paste with 2 cups of water, add asafoetida and salt to the mixture and bring it to a boil. When it starts boiling, add the tomato pieces and boil more until the tomatoes cook and the raw smell of tamarind goes away. This takes about 10 - 15 minutes on medium heat.
3. To the mixture from step 2, add the spice powder from step 1, 1 more cup of water and continue heating the contents until you see a frothy layer on the top and turn off the stove when you do.
4. In a pan, heat some cooking oil, add mustard seeds and wait for them to splutter. Immediately after they splutter, transfer the contents to the rasam from step 3.
5. Garnish with curry leaves and cilantro.

It is really comforting if you drink hot milagu rasam when you have a sore throat or cold. You can also have it with rice and ghee (clarified butter), as always :-).

Wednesday, March 4, 2009

Thaengaai (Coconut) Podi

Podi, in general, is a spicy powder which can be used as follows:
1.) for seasoning
2.) to mix with rice
3.) as a spicy side to go with idli, dosai, adai and the like

There are different podis for each of the above mentioned categories. Any type of podi that can be mixed with rice is comfort food, according to me. If you stocked up on your podis, you need not worry about cooking on a day when you feel lazy or tired or just don't feel like cooking. You can have rice and podi with some chips or yogurt. It is that simple and easy. I had planned to make thaengaai thogayal (thogayal is a spicy paste that can be had with rice) last weekend but ended up making thaengaai podi instead.

Ingredients (2 - 3 servings when mixed with cooked rice):

Cooking oil - a couple of drops
Grated/powdered coconut - 2 cups (using a measuring cup)
Dried red chillies - 4 to 5 (vary this to suit your taste)
Urad dhal - 1/2 cup (using a measuring cup)
Asafoetida - 1/2 teaspoon
Tamarind - a very small piece
(I don't use tamarind paste in thogayals and podis)
Salt to taste

Procedure:

1. In a small pan, fry the coconut and urad dhal separately in a couple of drops of cooking oil, with constant stirring, until they turn light golden brown in color and set aside. In the same pan, fry red chillies and tamarind separately and cool them.
Note: You need not FRY tamarind. You can sort of heat the tamarind at the very end for a few seconds (just to sort of soften it) when the pan is still hot.
2. Grind the above mixture along with salt and asafoetida to a coarse powder and you have the thaengaai podi.

Note:
The procedure for thaengaai thogayal is the almost the same as above except that you don't have to fry the coconut and you have to grind everything to a coarse paste by adding little water to it. You can store the podi version for a longer time than the thogayal version. I store all the podis in the freezer and they stay fresh for about 6 months.

Like I said before, you can have this with rice and ghee (clarified butter) or a few drops of sesame oil, and it also goes well idli and dosai. I like this with plain curd rice as well :-).

Tuesday, March 3, 2009

Potato Podimaas

Potato podimaas is the easiest potato curry that I know to make. The flavor of this curry comes from just the seasoning alone. No special masalas needed for this! I simply love to have it as a snack than as a side dish :-).

Ingredients (about 4 - 5 servings):

Potatoes - 4 to 5 small ones boiled, peeled and broken by hand
Ginger - 3/4 inch cut into small pieces
Green chillies - 3 to 4 cut into small pieces (vary this to suit your taste)
Cooking oil - 2 teaspoons
Mustard seeds - 1 teaspoon
Urad dhal - 1.5 teaspoons
Channa dhal - 1 teaspoon
Asafoetida - 1/4 teaspoon
Grated/powdered coconut (optional but tastes great if used) - 1 to 2 teaspoons
Curry leaves (optional) - a few
Juice from 1/2 a lime/lemon
Salt to taste

Procedure:

1. In a pan, heat some cooking oil, add mustard seeds and wait for them to splutter. After the mustard splutters, add the urad dhal, channa dhal, asafoetida, curry leaves, ginger and green chillies and fry until the the dhals turn light golden brown in color.
2. To step 1, add the broken potatoes and salt, mix the contents thoroughly, fry on medium heat for about 2 to 3 minutes and turn off the stove.
3. Mix in grated/powdered coconut while the curry is still hot and after it cools down a bit, add the juice from 1/2 a lime/lemon. Isn't it easy????

I use yukon gold potatoes (or yellow potatoes) in my cooking as the skin of that variety is very thin, it cooks easily and has a slight sweetness in it. You can try the same dish with steamed plantains as well.

I don't know of a specific main dish that would go well with this curry, but any type of sambar, rasam would do. Give it a shot and see if you like it :-).

Monday, March 2, 2009

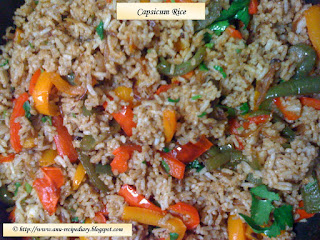
Capsicum Rice

I love peppers of different colors and try to use them at any given opportunity :-). I was searching for capsicum rice recipe one day and found a whole bunch of them. I combined the spices from a couple of them to suit my taste and it came out very well.

Ingredients (about 2 servings):

Basmati rice - 1 cup (using a measuring cup)
Capsicum (Peppers) - 3 small ones cut into thin slices
Onion - 1 small or 1/2 medium thinly sliced
Cooking oil - 2 tablespoons
Cumin seeds - 1.5 teaspoons
Cilantro - 3 teaspoons finely chopped
Salt to taste

To dry fry and grind into a fine powder:

Dried red chillies - 3 small (vary this to suit your taste)
Urad dhal - 3 teaspoons
Cinnamon - 1/2 inch stick
Cloves - 2 to 3
Cardamom - 1
Whole black pepper - 2 teaspoons (vary this to use your taste)
Roasted unsalted peanuts (optional) - 1 tablespoon

Procedure:

1. Cook 1 cup of basmati rice and set aside.
2. Dry fry dried red chillies, urad dhal, cinnamon, cloves, cardamom, whole black pepper and peanuts (if it is roasted, you need not fry them) SEPARATELY, grind them into a smooth powder and set aside.
3. In a wide pan, heat some cooking oil, add cumin seeds and onions and fry until the onions turn light golden brown in color.
4. Add the sliced peppers to the cooked onions in step 3, some salt and cook until the peppers turn soft (but not too soft).
5. To step 4, add the powder from step 2, mix the ingredients well, fry on medium heat for about 3 minutes and switch to low heat thereafter.
6. Add the cooked basmati rice to the pan, mix the contents thoroughly and turn off the stove. Garnish with chopped cilantro. Enjoy the capsicum rice!!!

Tip:
If you make more of the masala powder, you can save it for other curries as well.

For a slight variation in flavor, you can add finely chopped garlic to step 2 before adding the onions. For more flavor, you can also add a couple of teaspoons of ghee (clarified butter) to the rice.

The colored peppers enhance the color of the dish, add a little sweetness to it and also taste great :-). Serve this rice with your favorite raita or chips.